Kitchen Faucet Hose Leaking? A Comprehensive Guide to Troubleshooting and Repair
Discovering a kitchen faucet hose leaking can be a frustrating and potentially costly experience for any homeowner. A seemingly minor drip can quickly escalate into a significant water waste issue, leading to higher utility bills and potential water damage to your cabinets and flooring. This comprehensive guide will walk you through the common causes of a kitchen faucet hose leaking, how to diagnose the problem, and step-by-step instructions on how to repair or replace the faulty hose. We’ll also cover preventative measures to help you avoid future leaks and maintain the longevity of your kitchen faucet system.
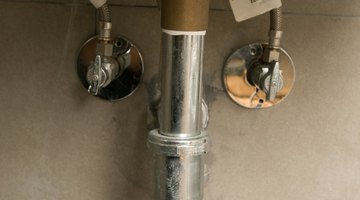
Understanding the Anatomy of Your Kitchen Faucet
Before diving into the troubleshooting process, it’s essential to understand the basic components of your kitchen faucet. A typical faucet consists of the faucet body, the spout, handles (for hot and cold water), and the hoses that connect the faucet to the water supply lines under your sink. The kitchen faucet hose is responsible for carrying water from the supply lines to the faucet body, allowing you to control the flow and temperature of the water. These hoses are typically made of flexible materials like braided stainless steel or reinforced rubber to withstand water pressure and allow for movement.
Common Causes of a Leaking Kitchen Faucet Hose
Several factors can contribute to a kitchen faucet hose leaking. Identifying the root cause is crucial for effective repair. Here are some of the most common culprits:
- Wear and Tear: Over time, the constant exposure to water pressure and temperature fluctuations can cause the hose material to degrade, leading to cracks, splits, or weakened connections.
- Loose Connections: The fittings that connect the kitchen faucet hose to the faucet body and supply lines can loosen over time due to vibrations or temperature changes.
- Damaged O-Rings or Washers: O-rings and washers are small rubber seals used to create a watertight connection between the hose and the fittings. These seals can dry out, crack, or become brittle over time, leading to leaks.
- High Water Pressure: Excessive water pressure can put undue stress on the kitchen faucet hose and its connections, accelerating wear and tear and increasing the risk of leaks.
- Corrosion: Mineral buildup and corrosion can damage the hose material or the fittings, compromising their integrity and leading to leaks.
- Improper Installation: If the kitchen faucet hose was not installed correctly in the first place, it may be prone to leaks due to improperly tightened connections or damaged threads.
Diagnosing the Source of the Leak
Pinpointing the exact location of the kitchen faucet hose leaking is the first step in the repair process. Here’s how to effectively diagnose the problem:
- Inspect the Hose: Carefully examine the entire length of the kitchen faucet hose for any visible signs of damage, such as cracks, splits, or bulges. Pay close attention to the areas near the fittings.
- Check the Connections: Gently tighten the fittings at both ends of the hose using a wrench. Be careful not to overtighten, as this can damage the threads.
- Feel for Moisture: Run your fingers along the hose and around the fittings to feel for any signs of moisture. Even a slight dampness can indicate a leak.
- Use a Flashlight: A flashlight can help you spot small leaks or drips that might be difficult to see under normal lighting conditions.
- Dry the Area: Use a clean cloth to dry the area around the hose and fittings. Then, turn on the faucet and watch carefully to see where the leak originates.
Repairing a Leaking Kitchen Faucet Hose
Once you’ve identified the source of the kitchen faucet hose leaking, you can attempt to repair it. Here are a few common repair methods:
Tightening Loose Connections
If the leak is caused by a loose connection, simply tightening the fitting with a wrench may be enough to solve the problem. Use two wrenches, one to hold the faucet body or supply line steady and the other to tighten the fitting. Again, avoid overtightening.
Replacing O-Rings or Washers
If the leak is coming from around the fittings and you suspect a damaged O-ring or washer, you’ll need to replace it. Turn off the water supply to the faucet and disconnect the hose. Remove the old O-ring or washer and replace it with a new one of the same size and type. Apply a small amount of plumber’s grease to the new seal to help it create a watertight connection.
Using Plumber’s Tape
For minor leaks around the threads of the fittings, you can try wrapping the threads with plumber’s tape (also known as Teflon tape). Remove the hose and clean the threads. Wrap the tape around the threads in a clockwise direction, overlapping each layer slightly. Reconnect the hose and tighten the fitting.
Replacing a Leaking Kitchen Faucet Hose
In some cases, the damage to the kitchen faucet hose may be too extensive to repair. If the hose is severely cracked, split, or corroded, it’s best to replace it entirely. Here’s how to replace a kitchen faucet hose:
- Turn Off the Water Supply: Locate the shut-off valves under your sink and turn them off to stop the water flow to the faucet.
- Disconnect the Old Hose: Use a wrench to disconnect the old hose from the faucet body and the supply line. Have a bucket and some towels handy to catch any remaining water in the hose.
- Measure the Old Hose: Before you head to the hardware store, measure the length of the old hose to ensure you purchase a replacement of the correct size.
- Purchase a New Hose: Choose a high-quality replacement hose that is compatible with your faucet. Consider upgrading to a braided stainless steel hose for added durability and longevity.
- Install the New Hose: Connect the new hose to the faucet body and the supply line, tightening the fittings securely with a wrench. Make sure to use new O-rings or washers if necessary.
- Turn On the Water Supply: Slowly turn on the water supply and check for any leaks around the new hose and fittings. Tighten the connections further if necessary.
Preventative Measures to Avoid Future Leaks
Taking preventative measures can help you avoid future kitchen faucet hose leaking and extend the life of your faucet system:
- Regular Inspections: Periodically inspect your kitchen faucet hose and connections for any signs of wear, damage, or leaks.
- Maintain Water Pressure: Ensure that your home’s water pressure is within the recommended range (typically between 40 and 60 PSI). High water pressure can strain the hoses and fittings.
- Use a Water Softener: If you have hard water, consider installing a water softener to reduce mineral buildup and corrosion.
- Replace Hoses Periodically: Even if your hoses don’t show any signs of damage, it’s a good idea to replace them every 5-10 years as a preventative measure.
- Proper Installation: When installing a new faucet or replacing hoses, ensure that all connections are properly tightened and sealed.
When to Call a Professional Plumber
While many kitchen faucet hose leaking issues can be resolved with DIY repairs, there are certain situations where it’s best to call a professional plumber:
- Extensive Water Damage: If the leak has caused significant water damage to your cabinets, flooring, or walls, a plumber can assess the damage and recommend appropriate repairs.
- Complex Plumbing Issues: If you’re dealing with complex plumbing issues, such as corroded pipes or damaged shut-off valves, it’s best to leave the repairs to a professional.
- Unsure of the Cause: If you’re unable to identify the source of the leak or are uncomfortable working with plumbing, a plumber can diagnose the problem and provide a solution.
- Persistent Leaks: If you’ve tried repairing the leak yourself and it continues to persist, a plumber can provide a more permanent solution.
A kitchen faucet hose leaking can be a nuisance, but by understanding the common causes, knowing how to diagnose the problem, and following the steps outlined in this guide, you can often repair or replace the hose yourself. Remember to take preventative measures to avoid future leaks and don’t hesitate to call a professional plumber when needed. Addressing a kitchen faucet hose leaking promptly will save you money on water bills and prevent potential water damage to your home. [See also: How to Replace a Kitchen Faucet], [See also: Common Plumbing Problems and Solutions], [See also: How to Detect Water Leaks in Your Home]
